VLAN tagging on uxen3
개요
VLAN id를 Tag 하는 방법 알아보기.
간략하게 설명하자면 A라는 스위치가 B라는 스위치와 Trunking을 하려면 VLAN 정보를 공유해야 하는데,
이때 사용하는 방식이 Tagging이다. 발신지 쪽에서 프레임에 vlan id을 tag하여 보내야 한다.
즉, 서버에서 L2로 프레임을 보낼때 vlan id를 tag 하여 보내는 설정을 해야 한다.
UXEN3(Xen hypervisor)에서 ovs(openvswitch) port에 연결된 모든 vif의 트래픽에 vlan id 를 tagging하여 L2로 전송하여 보자.
- ISL(Inter-switch link) : 시스코 전용 트렁킹 프로토콜. 카탈리스트 1700과 같이 예전 스위치 모델에서만 지원합니다.
- IEEE 802.1Q : IEEE 표준 트렁킹프로토콜. 대부분의 카탈리스트 스위치 모델에서 지원합니다.
UXEN3에서 vlan tgging 지원가능 여부
- Trunking protocol을 사용할 수 있는 모듈이 있을까? YES
# modinfo 8021q
filename:       /lib/modules/3.16.0-4-amd64/kernel/net/8021q/8021q.ko
version:        1.8
license:        GPL
alias:          rtnl-link-vlan
srcversion:     594EBB6763374BE3D856132
depends:        mrp,garp
intree:         Y
vermagic:       3.16.0-4-amd64 SMP mod_unload modversions
- VLAN 패키지가 설치 되어 있을까? NO..
root@gordon:/home/orchard# dpkg -l |grep vlan
- VLAN 패키지를 설치 가능 ? YES
# apt show vlan
Package: vlan
Version: 1.9-3.2
Installed-Size: 150 kB
Maintainer: Ard van Breemen <ard@kwaak.net>
Depends: libc6 (>= 2.14), iproute2
Tag: interface::commandline, network::configuration, role::program,
 scope::utility
Section: misc
Priority: extra
Download-Size: 36.5 kB
APT-Sources: http://ftp.daumkakao.com/debian/ jessie/main amd64 Packages
Description: user mode programs to enable VLANs on your ethernet devices
 This package contains the user mode programs you need to add and remove
 VLAN devices from your ethernet devices.
 A typical application for a VLAN enabled box is a single wire firewall,
 router or load balancer.
 You need a VLAN Linux kernel for this.  Linux kernel versions >= 2.4.14
 have VLAN support.

# dpkg -l |grep libc6 |grep ^ii
ii  libc6:amd64                     2.19-18+deb8u10                amd64        GNU C Library: Shared libraries

# dpkg -l |grep iproute2 |grep ^ii
ii  iproute2                        3.16.0-2                       amd64        networking and traffic control tools

# uname -r
3.16.0-4-amd64
시나리오
UXEN3에서 eth0 인터페이스가 추가되었다.
eth0 인터페이스를 통해 나가는 모든 프레임은 vlan id=700을 태그 하도록 설정한다.
xenbr0 브릿지를 만들고 xenbr0 브릿지 포트에 연결된 모든 vif들의 트래픽에도 vlan id=700을 태그 하도록 해야 한다.
아래 토폴로지중 LAN0에 대한 설정을 다루어 보기로 한다.
LAN0 <ㅡ eth0 <ㅡ eth.700 <ㅡ xenbr0 <ㅡ vif1.0 <ㅡ eth0(VM) 통신 과정과 실제 vlan id를 어디서 tagging하는지 살펴보자.
토폴로지)
Xen Networking with VLANs
(참조 : https://wiki.xenproject.org/wiki/Xen_Networking)
     LAN0                                                  LAN1
      |                                                     |
+-----+-----------------------------------------------------+-----+
|     |                                                     |     |
|   eth0                                                  eth1    |
|     |                                                     |     |
| +---+-------------------------+ +-------------------------+---+ |
| |   |                         | |                         |   | |
| | eth0.700                    | |                    eth1.200 | |
| |                             | |                             | |
| | xenbr0       vif1.0  vif2.0 | |  vif1.1  vif2.1      xenbr1 | |
| |                |       \    | |    /       |                | |
| +---^------------+---------\--+ +--/---------+------------^---+ |
|     |            |           \   /           |            |     |
|     |     +------+-------------X-------------+------+     |     |
|     |     |      |           /   \           |      |     |     |
|     |     | +----+---------/--+ +--\---------+----+ |     |     |
|     |     | |    |       /    | |    \       |    | |     |     |
|     |     | |  eth0    eth1   | |   eth0   eth1   | |     |     |
|     |     | |    |       |    | |    |       |    | |     |     |
|   +-+-+   | |  +-+-+   +-+-+  | |  +-+-+   +-+-+  | |   +-+-+   |
|   |   |   | |  |   |   |   |  | |  |   |   |   |  | |   |   |   |
|  www ssh  | | www ssh ftp pop | | www ssh ftp pop | |  ftp pop  |
|           | |                 | |                 | |           |
|  Domain0  | |     Domain1     | |     Domain2     | |  Domain0  |
+-----------+ +-----------------+ +-----------------+ +-----------+
UXEN3에서 VLAN Tagging 설정 방법
- Trunk를 사용하기 위한 모듈을 load 한다.
# modprobe 8021q

# lsmod |grep 8021q                             ##확인.
8021q                  27844  0
garp                   13117  1 8021q
mrp                    17343  1 8021q

# echo "8021q" >> /etc/modules                  ##리부팅을 하여도 해당 모듈이 load되도록 추가한다.
- vlan 패키지를 설치한다. 외부 통신이 된다면 apt로 설치 가능하지만, dpkg로 설치를 진행하였다.
# wget http://ftp.daumkakao.com/debian/pool/main/v/vlan/vlan_1.9-3.2%2bb1_amd64.deb
converted 'http://ftp.daumkakao.com/debian/pool/main/v/vlan/vlan_1.9-3.2%2bb1_amd64.deb' (ANSI_X3.4-1968) -> 'http://ftp.daumkakao.com/debian/pool/main/v/vlan/vlan_1.9-3.2+b1_amd64.deb' (UTF-8)
--2018-03-27 14:58:38--  http://ftp.daumkakao.com/debian/pool/main/v/vlan/vlan_1.9-3.2+b1_amd64.deb
Resolving ftp.daumkakao.com (ftp.daumkakao.com)... 113.29.189.165
Connecting to ftp.daumkakao.com (ftp.daumkakao.com)|113.29.189.165|:80... connected.
HTTP request sent, awaiting response... 200 OK
Length: 36900 (36K) [application/x-debian-package]
Saving to: 'vlan_1.9-3.2+b1_amd64.deb'

vlan_1.9-3.2+b1_amd64.deb  100%[=======================================>]  36.04K  --.-KB/s   in 0s

2018-03-27 14:58:38 (224 MB/s) - 'vlan_1.9-3.2+b1_amd64.deb' saved [36900/36900]

# dpkg -i vlan_1.9-3.2+b1_amd64.deb
Selecting previously unselected package vlan.
(Reading database ... 45932 files and directories currently installed.)
Preparing to unpack vlan_1.9-3.2+b1_amd64.deb ...
Unpacking vlan (1.9-3.2+b1) ...
Setting up vlan (1.9-3.2+b1) ...
Processing triggers for man-db (2.7.0.2-5) ...

# dpkg -l |grep vlan |grep ii
ii  vlan                            1.9-3.2+b1                     amd64        user mode programs to enable VLANs on your ethernet devices
- vlan id를 지정하여 물리 NIC과 binding한다. 2번째 인자값은 vlan id이다.
- 이렇게 하면 eth0과 eth0.700이 binding되어 eth0은 eth0.700에게 전달받은 모든 프레임에 vlan id 700을 tag 하여 L2로 전달된다.
# vconfig add eth0 700
Added VLAN with VID == 700 to IF -:eth0:-

# cat /proc/net/vlan/config
VLAN Dev name    | VLAN ID
Name-Type: VLAN_NAME_TYPE_RAW_PLUS_VID_NO_PAD
eth0.700       | 700  | eth0

# ip a|grep eth0.700
17: eth0.700@eth0: <BROADCAST,MULTICAST> mtu 1500 qdisc noop state DOWN group default
link/ether 00:e3:3d:e8:00:be brd ff:ff:ff:ff:ff:ff
- interface 설정파일 작성. (openvswitch)
- reboot 하여도 모든 interface가 정상적으로 up된 것을 확인하였다.
기존 물리 NIC인 eth0을 xenbr0 bridge port에 연결하지 않고 eth0.700을 연결한다.
# vi /etc/network/interfaces

auto eth0
iface eth0 inet manual
post-up ethtool -K eth0 tx off

allow-xenbr0 eth0.700
iface eth0.700 inet manual
        vlan-raw-device eth0
        ovs_type OVSPort
        ovs_bridge xenbr0

allow-ovs xenbr0
iface xenbr0 inet manual
        ovs_type OVSBridge
        ovs_ports eth0.700
        birdge_maxwait 5
        up ip link set xenbr0 up

# ifup xenbr0

# ovs-vsctl list-ports xenbr0
eth0.700

# ip a
1: lo: <LOOPBACK,UP,LOWER_UP> mtu 65536 qdisc noqueue state UNKNOWN group default
    link/loopback 00:00:00:00:00:00 brd 00:00:00:00:00:00
    inet 127.0.0.1/8 scope host lo
       valid_lft forever preferred_lft forever
    inet6 ::1/128 scope host
       valid_lft forever preferred_lft forever
2: eth0: <BROADCAST,MULTICAST,UP,LOWER_UP> mtu 1500 qdisc pfifo_fast state UP group default qlen 1000
    link/ether 00:e3:3d:e8:00:be brd ff:ff:ff:ff:ff:ff
    inet6 fe80::2e3:3dff:fee8:be/64 scope link
       valid_lft forever preferred_lft forever
3: eth1: <BROADCAST,MULTICAST,UP,LOWER_UP> mtu 1500 qdisc pfifo_fast master ovs-system state UP group default qlen 1000
    link/ether 00:1e:90:ac:2b:3c brd ff:ff:ff:ff:ff:ff
    inet6 fe80::21e:90ff:feac:2b3c/64 scope link
       valid_lft forever preferred_lft forever
12: ovs-system: <BROADCAST,MULTICAST> mtu 1500 qdisc noop state DOWN group default
    link/ether 82:af:ab:a6:9b:12 brd ff:ff:ff:ff:ff:ff
16: xenbr1: <BROADCAST,MULTICAST,UP,LOWER_UP> mtu 1500 qdisc noqueue state UNKNOWN group default
    link/ether 00:1e:90:ac:2b:3c brd ff:ff:ff:ff:ff:ff
    inet 192.168.0.150/24 brd 192.168.0.255 scope global xenbr1
       valid_lft forever preferred_lft forever
    inet6 fe80::21e:90ff:feac:2b3c/64 scope link
       valid_lft forever preferred_lft forever
19: xenbr0: <BROADCAST,MULTICAST,UP,LOWER_UP> mtu 1500 qdisc noqueue state UNKNOWN group default
    link/ether 00:e3:3d:e8:00:be brd ff:ff:ff:ff:ff:ff
    inet6 fe80::2e3:3dff:fee8:be/64 scope link
       valid_lft forever preferred_lft forever
20: eth0.700@eth0: <BROADCAST,MULTICAST,UP,LOWER_UP> mtu 1500 qdisc noqueue master ovs-system state UP group default
    link/ether 00:e3:3d:e8:00:be brd ff:ff:ff:ff:ff:ff
    inet6 fe80::2e3:3dff:fee8:be/64 scope link
   valid_lft forever preferred_lft forever
- VM을 만들어 xenbr0 브릿지에 vif가 추가 되도록 하였다. (vm 생성 과정 생략)
- 이렇게 설정이 되면 VM은 vlan의 존재를 모르고 모든 VM의 트래픽의 tagging은 dom0에서 처리한다.
# xl create bino-debian.cfg

# ovs-vsctl list-ports xenbr0
eth0.700
vif3.0
- 검증. 실제 프레임이 vlan id = 700 을 tag하여 L2로 전송되는지 확인해보자. 실제 스위치를 준비하여 Trunk설정 하지는 않았고, 패킷을 분석하여 vlan id를 Tag하는지 확인할 것이다.
아래 4개의 인터페이스를 각각 tcpdump로 모니터링하여 비교 분석 해보기로 한다.
- PM에서 eth0 인터페이스
- PM에서 eth0.700 인터페이스
- PM에서 vif3.0 인터페이스
- VM에서 eth0 인터페이스
흐름도
eth0(VM) —-> vif3.0 —> xenbr0 —> eth0.700 —> eth0 —> LAN0
PM과 VM의 인터페이스 정보는 아래와 같다.
- PM의 정보
root@bino:/home/orchard# ip a
1: lo: <LOOPBACK,UP,LOWER_UP> mtu 65536 qdisc noqueue state UNKNOWN group default
    link/loopback 00:00:00:00:00:00 brd 00:00:00:00:00:00
    inet 127.0.0.1/8 scope host lo
       valid_lft forever preferred_lft forever
    inet6 ::1/128 scope host
       valid_lft forever preferred_lft forever
2: eth0: <BROADCAST,MULTICAST,UP,LOWER_UP> mtu 1500 qdisc pfifo_fast state UP group default qlen 1000
    link/ether 00:e3:3d:e8:00:be brd ff:ff:ff:ff:ff:ff
    inet6 fe80::2e3:3dff:fee8:be/64 scope link
       valid_lft forever preferred_lft forever
3: eth1: <BROADCAST,MULTICAST,UP,LOWER_UP> mtu 1500 qdisc pfifo_fast master ovs-system state UP group default qlen 1000
    link/ether 00:1e:90:ac:2b:3c brd ff:ff:ff:ff:ff:ff
    inet6 fe80::21e:90ff:feac:2b3c/64 scope link
       valid_lft forever preferred_lft forever
4: ovs-system: <BROADCAST,MULTICAST> mtu 1500 qdisc noop state DOWN group default
    link/ether 76:1b:e1:60:64:a6 brd ff:ff:ff:ff:ff:ff
5: xenbr1: <BROADCAST,MULTICAST,UP,LOWER_UP> mtu 1500 qdisc noqueue state UNKNOWN group default
    link/ether 00:1e:90:ac:2b:3c brd ff:ff:ff:ff:ff:ff
    inet 192.168.0.150/24 brd 192.168.0.255 scope global xenbr1
       valid_lft forever preferred_lft forever
    inet6 fe80::21e:90ff:feac:2b3c/64 scope link
       valid_lft forever preferred_lft forever
6: xenbr0: <BROADCAST,MULTICAST,UP,LOWER_UP> mtu 1500 qdisc noqueue state UNKNOWN group default
    link/ether 00:e3:3d:e8:00:be brd ff:ff:ff:ff:ff:ff
    inet6 fe80::2e3:3dff:fee8:be/64 scope link
       valid_lft forever preferred_lft forever
7: eth0.700@eth0: <BROADCAST,MULTICAST,UP,LOWER_UP> mtu 1500 qdisc noqueue master ovs-system state UP group default
    link/ether 00:e3:3d:e8:00:be brd ff:ff:ff:ff:ff:ff
    inet6 fe80::2e3:3dff:fee8:be/64 scope link
       valid_lft forever preferred_lft forever
16: vif3.0: <BROADCAST,MULTICAST,UP,LOWER_UP> mtu 1500 qdisc pfifo_fast master ovs-system state UP group default qlen 32
    link/ether fe:ff:ff:ff:ff:ff brd ff:ff:ff:ff:ff:ff
inet6 fe80::fcff:ffff:feff:ffff/64 scope link
       valid_lft forever preferred_lft forever
17: vif3.1: <BROADCAST,MULTICAST,UP,LOWER_UP> mtu 1500 qdisc pfifo_fast master ovs-system state UP group default qlen 32
    link/ether fe:ff:ff:ff:ff:ff brd ff:ff:ff:ff:ff:ff
    inet6 fe80::fcff:ffff:feff:ffff/64 scope link
       valid_lft forever preferred_lft forever
- VM의 정보
VM:~# ip a
1: lo: <LOOPBACK,UP,LOWER_UP> mtu 65536 qdisc noqueue state UNKNOWN group default qlen 1
    link/loopback 00:00:00:00:00:00 brd 00:00:00:00:00:00
    inet 127.0.0.1/8 scope host lo
       valid_lft forever preferred_lft forever
    inet6 ::1/128 scope host
       valid_lft forever preferred_lft forever
2: eth0: <BROADCAST,MULTICAST,UP,LOWER_UP> mtu 1500 qdisc pfifo_fast state UP group default qlen 1000
    link/ether 00:16:3e:62:cc:65 brd ff:ff:ff:ff:ff:ff
    inet 10.1.1.185/24 brd 10.1.1.255 scope global eth0
       valid_lft forever preferred_lft forever
    inet6 fe80::216:3eff:fe62:cc65/64 scope link
       valid_lft forever preferred_lft forever
3: eth1: <BROADCAST,MULTICAST,UP,LOWER_UP> mtu 1500 qdisc pfifo_fast state UP group default qlen 1000
    link/ether 00:16:3e:55:61:36 brd ff:ff:ff:ff:ff:ff
    inet 192.168.0.185/24 brd 192.168.0.255 scope global eth1
       valid_lft forever preferred_lft forever
    inet6 fe80::216:3eff:fe55:6136/64 scope link
       valid_lft forever preferred_lft forever
각각의 인터페이스를 모니터링준비
PM:~# tcpdump -i eth0 -e
PM:~# tcpdump -i eth0.700 -e
PM:~# tcpdump -i vif3.0 -e
VM:~# tcpdump -i eth0 -e
VM에서 ping으로 1개의 패킷을 보내 L2로 전송될때 vlan id가 어디서 찍히는지 보자.
VM:~# ping -c 1 10.1.1.152
PING 10.1.1.152 (10.1.1.152) 56(84) bytes of data.

--- 10.1.1.152 ping statistics ---
1 packets transmitted, 0 received, 100% packet loss, time 0ms
- VM에서의 eth0 인터페이스
VM:~# tcpdump -i eth0 -e
tcpdump: verbose output suppressed, use -v or -vv for full protocol decode
listening on eth0, link-type EN10MB (Ethernet), capture size 262144 bytes
16:13:49.368364 00:16:3e:62:cc:65 (oui Unknown) > 00:20:78:12:19:f1 (oui Unknown), ethertype IPv4 (0x0800), length 98: 10.1.1.185 > 10.1.1.152: ICMP echo request, id 2238, seq 1, length 64
16:13:54.444131 00:16:3e:62:cc:65 (oui Unknown) > 00:20:78:12:19:f1 (oui Unknown), ethertype ARP (0x0806), length 42: Request who-has 10.1.1.152 tell 10.1.1.185, length 28
16:13:54.444881 00:20:78:12:19:f1 (oui Unknown) > 00:16:3e:62:cc:65 (oui Unknown), ethertype ARP (0x0806), length 56: Reply 10.1.1.152 is-at 00:20:78:12:19:f1 (oui Unknown), length 42

3 packets captured
3 packets received by filter
0 packets dropped by kernel
- PM에서의 vif3.0 인터페이스
PM:~# tcpdump -i vif3.0 -e
tcpdump: verbose output suppressed, use -v or -vv for full protocol decode
listening on vif3.0, link-type EN10MB (Ethernet), capture size 262144 bytes
16:13:49.361134 00:16:3e:62:cc:65 (oui Unknown) > 00:20:78:12:19:f1 (oui Unknown), ethertype IPv4 (0x0800), length 98: 10.1.1.185 > 10.1.1.152: ICMP echo request, id 2238, seq 1, length 64
16:13:54.436979 00:16:3e:62:cc:65 (oui Unknown) > 00:20:78:12:19:f1 (oui Unknown), ethertype ARP (0x0806), length 42: Request who-has 10.1.1.152 tell 10.1.1.185, length 28
16:13:54.437615 00:20:78:12:19:f1 (oui Unknown) > 00:16:3e:62:cc:65 (oui Unknown), ethertype ARP (0x0806), length 56: Reply 10.1.1.152 is-at 00:20:78:12:19:f1 (oui Unknown), length 42

3 packets captured
3 packets received by filter
0 packets dropped by kernel
- PM에서의 eth0.700 인터페이스
PM:~# tcpdump -i eth0.700 -e
tcpdump: verbose output suppressed, use -v or -vv for full protocol decode
listening on eth0.700, link-type EN10MB (Ethernet), capture size 262144 bytes
16:13:49.361291 00:16:3e:62:cc:65 (oui Unknown) > 00:20:78:12:19:f1 (oui Unknown), ethertype IPv4 (0x0800), length 98: 10.1.1.185 > 10.1.1.152: ICMP echo request, id 2238, seq 1, length 64
16:13:54.437103 00:16:3e:62:cc:65 (oui Unknown) > 00:20:78:12:19:f1 (oui Unknown), ethertype ARP (0x0806), length 42: Request who-has 10.1.1.152 tell 10.1.1.185, length 28
16:13:54.437527 00:20:78:12:19:f1 (oui Unknown) > 00:16:3e:62:cc:65 (oui Unknown), ethertype ARP (0x0806), length 56: Reply 10.1.1.152 is-at 00:20:78:12:19:f1 (oui Unknown), length 42

3 packets captured
3 packets received by filter
0 packets dropped by kernel
- PM에서의 eth0 인터페이스
PM:~# tcpdump -i eth0 -e
tcpdump: verbose output suppressed, use -v or -vv for full protocol decode
listening on eth0, link-type EN10MB (Ethernet), capture size 262144 bytes
16:13:49.361297 00:16:3e:62:cc:65 (oui Unknown) > 00:20:78:12:19:f1 (oui Unknown), ethertype 802.1Q (0x8100), length 102: vlan 700, p 0, ethertype IPv4, 10.1.1.185 > 10.1.1.152: ICMP echo request, id 2238, seq 1, length 64
16:13:49.361664 00:20:78:12:19:f1 (oui Unknown) > Broadcast, ethertype ARP (0x0806), length 60: Request who-has 10.1.1.185 tell 10.1.1.152, length 46
16:13:50.361181 00:20:78:12:19:f1 (oui Unknown) > Broadcast, ethertype ARP (0x0806), length 60: Request who-has 10.1.1.185 tell 10.1.1.152, length 46
16:13:51.361190 00:20:78:12:19:f1 (oui Unknown) > Broadcast, ethertype ARP (0x0806), length 60: Request who-has 10.1.1.185 tell 10.1.1.152, length 46
16:13:54.437113 00:16:3e:62:cc:65 (oui Unknown) > 00:20:78:12:19:f1 (oui Unknown), ethertype 802.1Q (0x8100), length 46: vlan 700, p 0, ethertype ARP, Request who-has 10.1.1.152 tell 10.1.1.185, length 28
16:13:54.437527 00:20:78:12:19:f1 (oui Unknown) > 00:16:3e:62:cc:65 (oui Unknown), ethertype 802.1Q (0x8100), length 60: vlan 700, p 0, ethertype ARP, Reply 10.1.1.152 is-at 00:20:78:12:19:f1 (oui Unknown), length 42

6 packets captured
6 packets received by filter
0 packets dropped by kernel
결과 분석
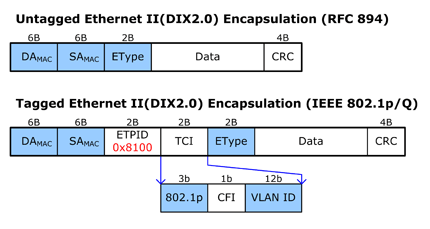
L2:Ethernet 헤더는 Destination MAC Address, Source MAC Address 그리고 Ethernet Type으로 구성된다.
eth0(PM) 패킷의 헤더를 설명하자면 첫 번째 필드에는 시간이 담겨있고, 두 번째 필드부터 DA(00:16:3e:62:cc:65), 세 번째 필드는 SA(00:20:78:12:19:f1), 원래라면(Untagged) 네 번째 필드에 L3패킷의 타입을 담는다. (PM의 eth0을 제외한 나머지는 모두 그렇다.) 하지만 해당 패킷은 네번째 필드부터 vlan 정보가 담긴다. 802.1q(0x8100)와 다섯번째 필드에 vlan 700 인 vlan id가 담기고, 다시 L3의 타입이 담기게 된다.
eth(VM), vif3.0, eth0.700 모두 동일하게 vlan id를 tag하지 않는다. 즉 PM의 물리NIC인 eth0인터페이스를 거쳐 패킷이 L2로 흐를 때 vlan id가 tag된다.
이해를 돕기 위한 이미지
만약 xenbr0에 vif가 많다면 모두 eth0 NIC을 거치기 때문에 VLAN id가 tag된다.